
Welcome! You’re in the right place to learn how to get started on Honeycomb and how to use the app to connect and collaborate with your parent community. Jump to wherever is most relevant to you.
Honeycomb is a parent collaboration app that helps you team up with your school, club or sports community to conquer day-to-day parenting logistics, together. Honeycomb’s private groups are set up by Room Parents, PTAs, school leaders, team managers and super awesome community-focused parents.
Our goal is to save you time and energy on all the parenting things, while strengthening your parent community. Honeycomb’s shared smart calendar and to-do list helps you stay on top of dates and deadlines (we use AI to extract key details from school or club emails). Combined with family accounts and chat designed for coordination, Honeycomb makes sharing logistics easier (think: carpooling, drop off playdates, summer camp planning).
Your school or club may use another app for official program communication (e.g. admin-to-family communication). Honeycomb is a complement to these tools, as we focus on family-to-family collaboration and connection.
Your school or organization's staff may be present and active on Honeycomb (they should be clearly badged). They may play an important role in helping your Honeycomb community run (e.g updating calendars, adding new members, posting updates). But they can never see chats they are not included in, private DMs, or events or activities they aren’t part of. Honeycomb is not built for organizations, it’s built for parents.
Sounds good? Let’s get started…
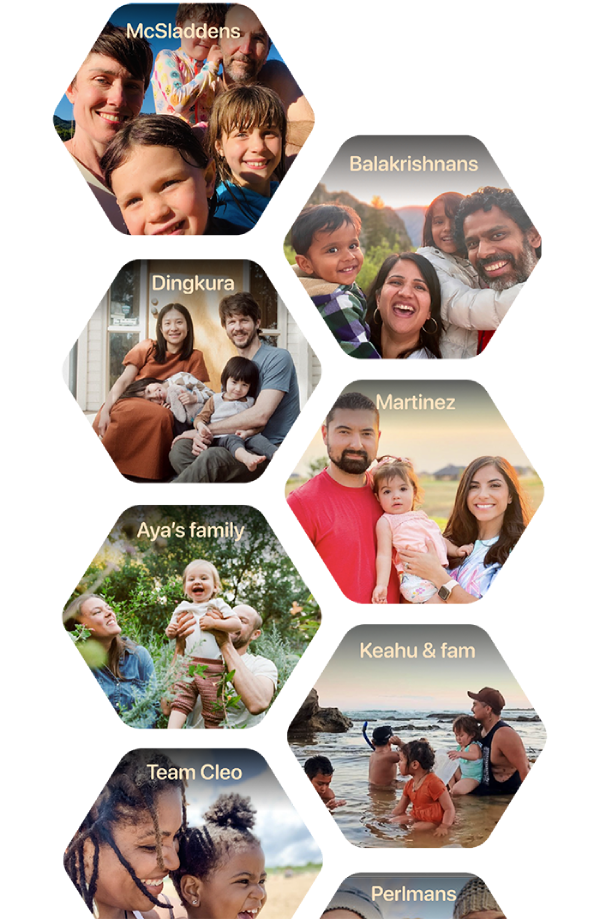
Your Honeycomb family profile helps your community put faces to names, makes it easy to get in touch, and creates opportunities for connection (pickleball, anyone?). Honeycomb profiles also share communication across a child’s parents –– so no more guessing who the primary parent is!
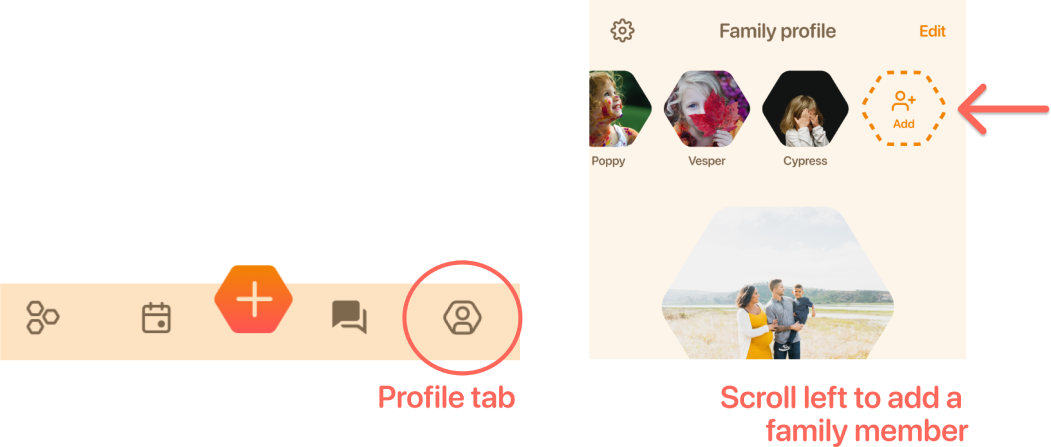
Make sure your whole fam is included: Help other families out by adding all the children and adults who live in your household. We recommend adding any caregivers as well. To add a family member, tap on the Profile tab, then swipe the hexagons at the top to the left, and tap on the “Add” hexagon.

Add photos: Give the gift of removing an awkward pause the next time you run into that parent who’s always forgetting your name at pick up. Check your family members’ hexagons at the top of your Profile tab to make sure everyone has a photo. Add photos and fill in member profiles by choosing a member, then tapping “Edit.”
Don’t have a photo on hand or not ready to share? You can add a placeholder photo (landscapes and animals are great!). Your partner can also login and change their photo when they join.
📣 IMPORTANT: Make sure your partner has access to your family account: If you live in a two-parent household, help both parents stay in the loop by enabling family account access. It means you can both see the same stuff (messages, calendar, etc.) as well as post messages, respond to and create events, edit the family profile and more.
You can give a partner access during account set-up. If you’ve already finished set-up, you can grant access in your profile:
The newly added parent will receive a text to join your family account.
📣 IMPORTANT: If your child lives in two households you should do what’s best for your family, but in general, we recommend that you create a separate account for each household.
Add useful profile details: From allergies to playdate sickness policies to knowing who is present in a household, profiles surface information that makes connecting easier.
To complete your profile, tap Edit while on each hexagon to enter helpful info at the family and individual level.

Once your profile is complete, explore the tabs at the bottom of your screen to get the lay of the land in Honeycomb:
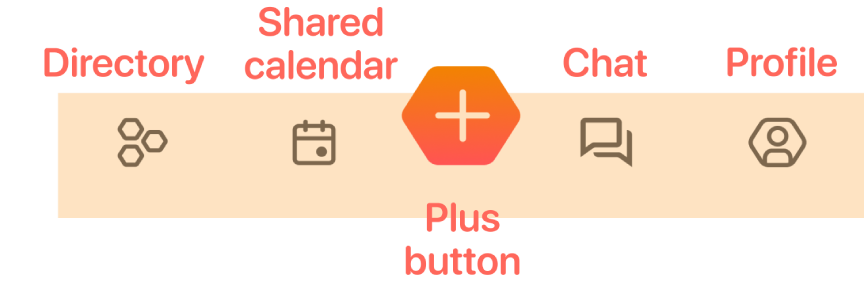
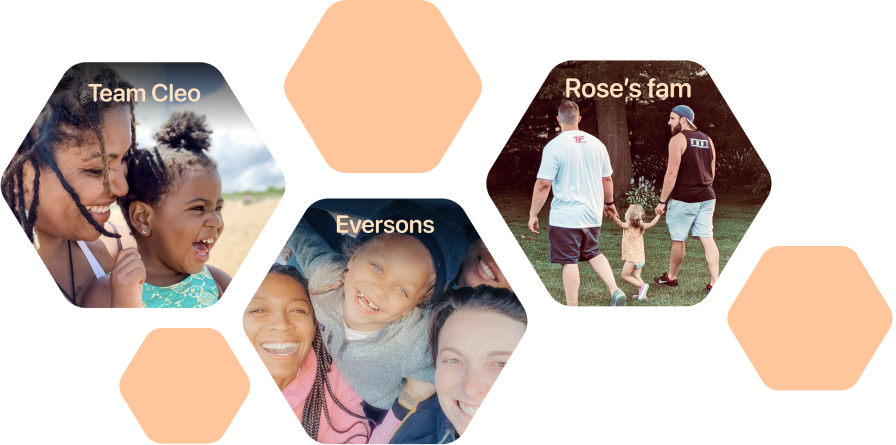
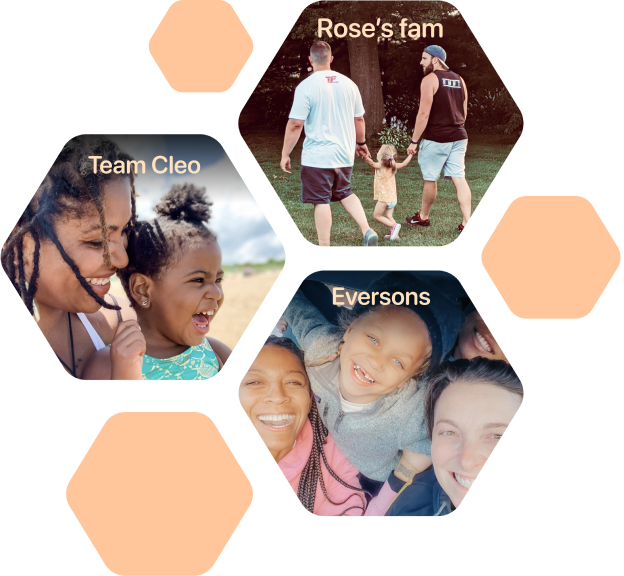
 Directory tab: This is your home base, where you’ll
see your community’s smiling faces whenever you open the app. Tap on the
hexagons to check out different families’ profiles, and scroll through families’
individual members to get to know your kids’ classmates and their siblings,
parents, and caregivers. Cozy up next to your kiddo and use Honeycomb to have
your child share more about their buds.
Directory tab: This is your home base, where you’ll
see your community’s smiling faces whenever you open the app. Tap on the
hexagons to check out different families’ profiles, and scroll through families’
individual members to get to know your kids’ classmates and their siblings,
parents, and caregivers. Cozy up next to your kiddo and use Honeycomb to have
your child share more about their buds.
 Shared calendar tab: Stay on top of all the things
with Honeycomb’s smart shared calendar powered by Worker Bee, our community AI assistant.
Worker Bee extracts dates and details from your school or club emails, so you
don’t have to. You can sync the always-up-to-date Honeycomb Calendar to your own
calendar app.
Shared calendar tab: Stay on top of all the things
with Honeycomb’s smart shared calendar powered by Worker Bee, our community AI assistant.
Worker Bee extracts dates and details from your school or club emails, so you
don’t have to. You can sync the always-up-to-date Honeycomb Calendar to your own
calendar app.
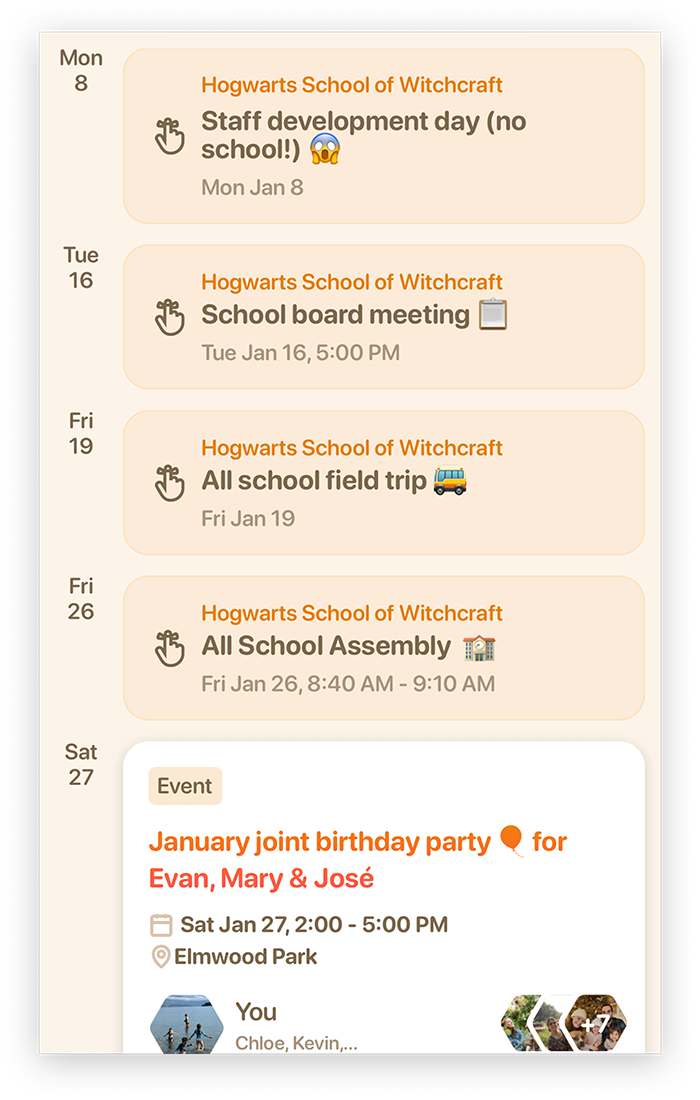
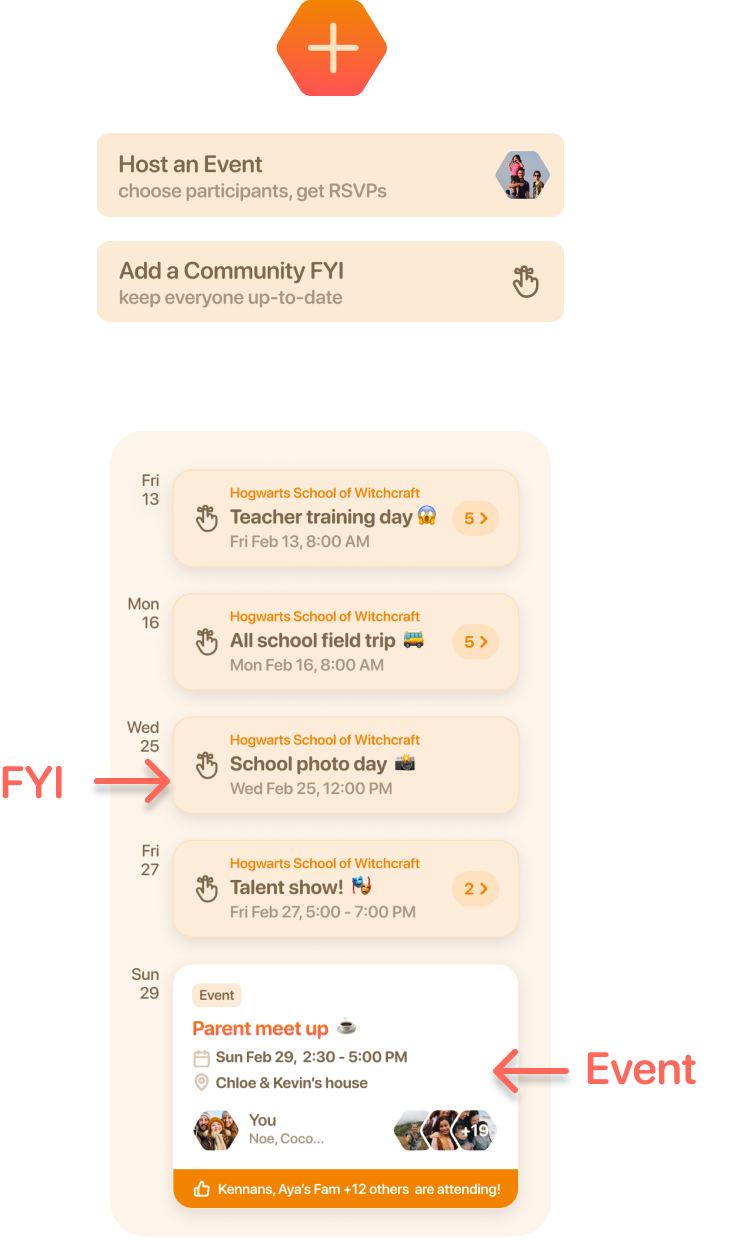
Your Honeycomb Calendar is made up of Community FYIs –– lightweight, shared reminders –– which are visible to your entire group, and can be added or edited by anyone in the community. It also features Events –– think: a simple Evite –– for hosted gatherings which need an RSVP. You can add an Event or FYI by tapping the orange plus button on the bottom tab bar.
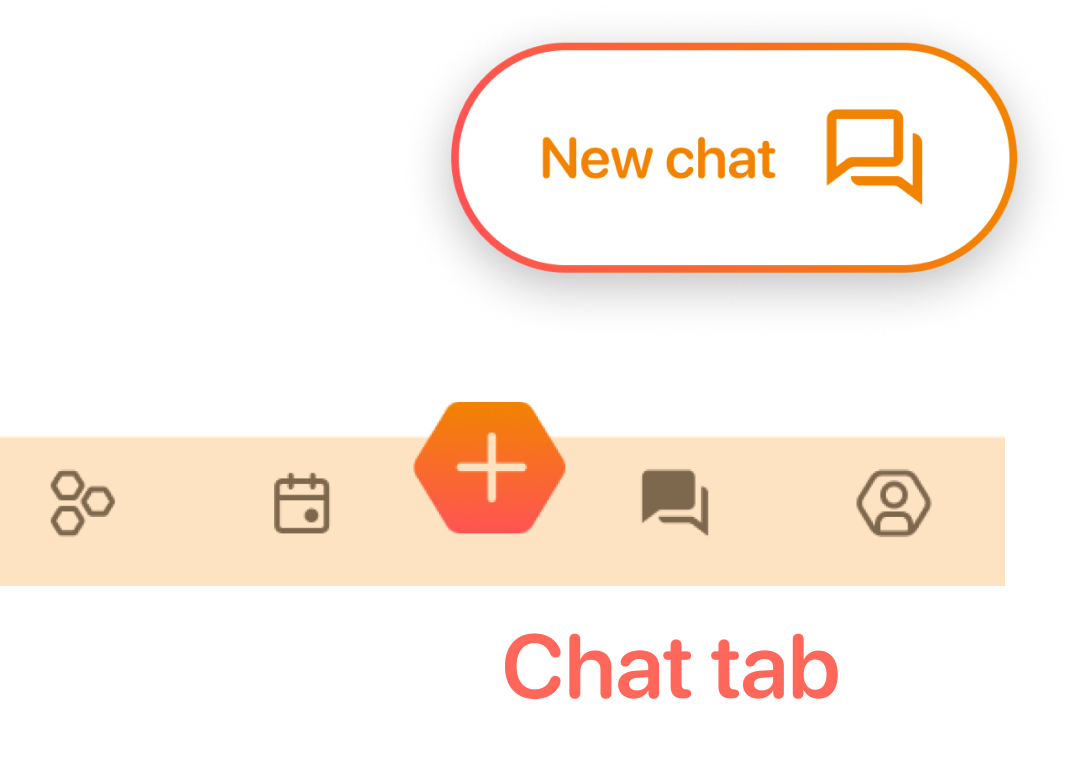
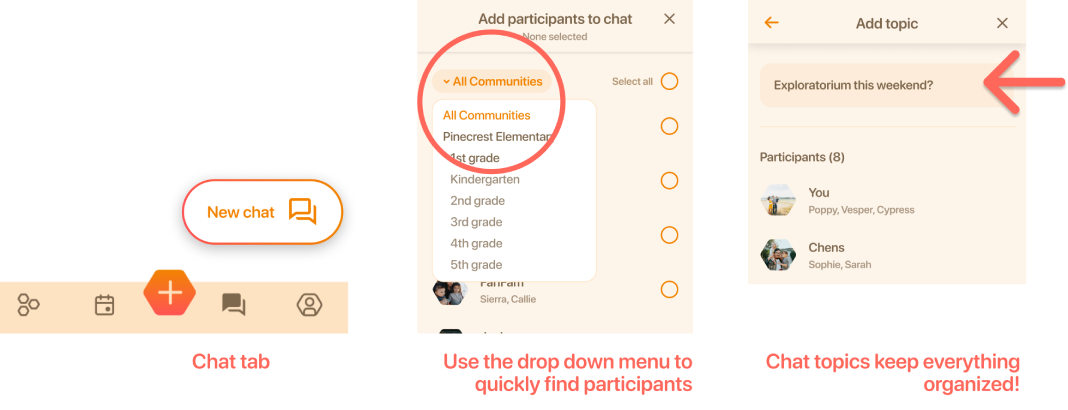
![]() Chat tab: This is where you’ll find all the convos
around your parent life, neatly organized in a single space –– no more sprawling
text chains or overlapping WhatsApp threads!
Chat tab: This is where you’ll find all the convos
around your parent life, neatly organized in a single space –– no more sprawling
text chains or overlapping WhatsApp threads!
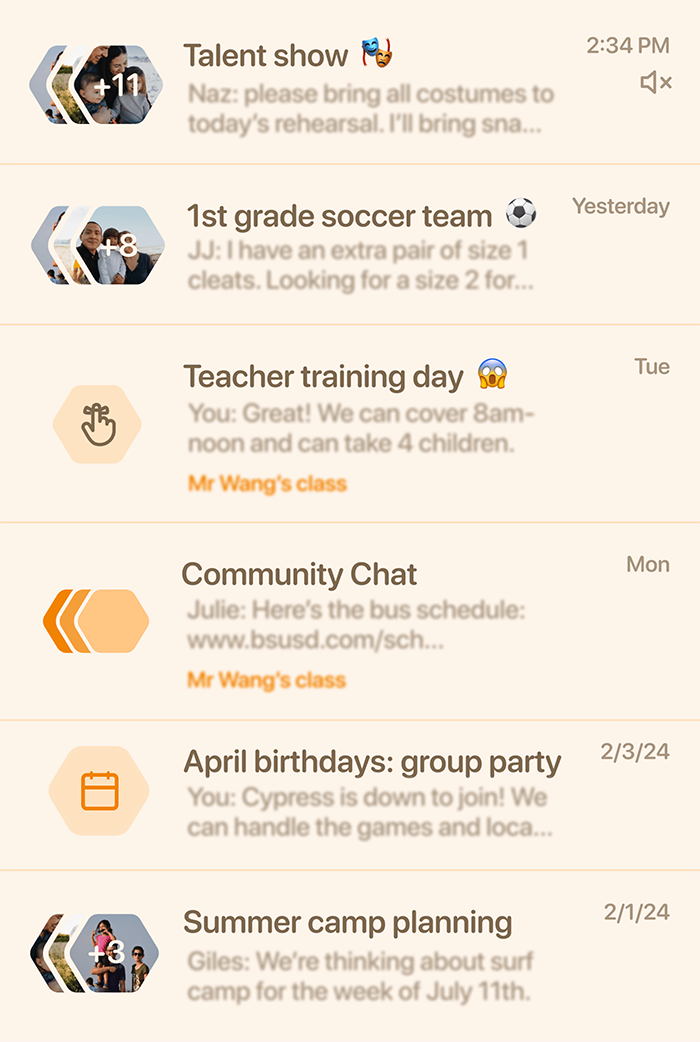
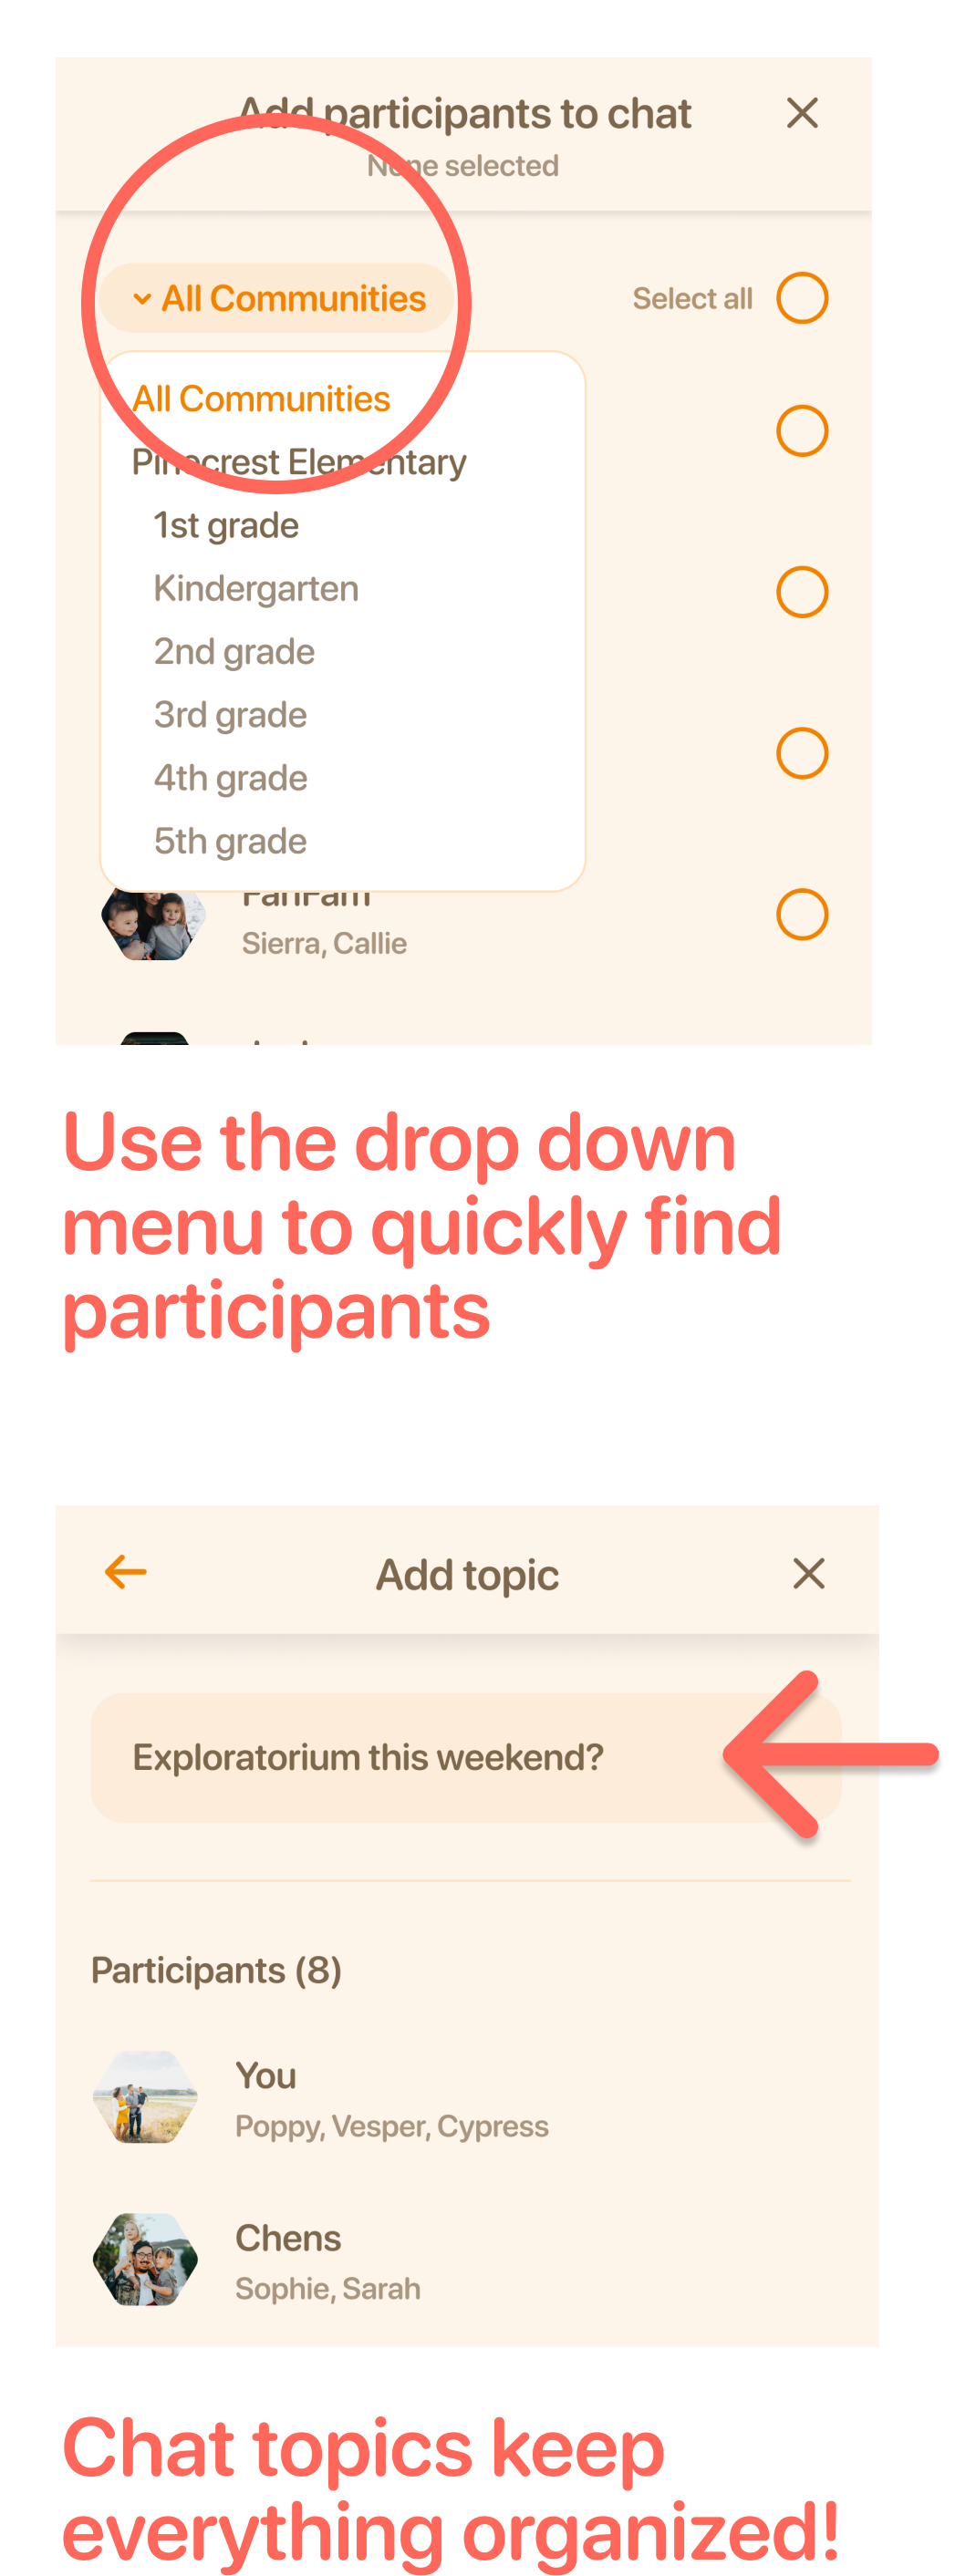
To help make parenting logistics less overwhelming, all chats have topics, and we encourage parents to start new chats for new topics so they are easy to find, manage, and revisit. Tap the 'New chat' button on the bottom right to start a convo.

Mute or leave chat threads at any time!
Your “Community Chat” thread always includes everyone in your community (even those who recently joined) and is best for general, community-wide announcements.
 Profile tab: You can view how you appear in your
community, and update your profile whenever you’d like. Just tap “Edit” in the upper
right corner to make any changes. If you’re still missing a family member, or want
to add a caregiver (au pairs, grandparents –– you name it!) scroll to the right of
your hexagons and tap “Add.”
Profile tab: You can view how you appear in your
community, and update your profile whenever you’d like. Just tap “Edit” in the upper
right corner to make any changes. If you’re still missing a family member, or want
to add a caregiver (au pairs, grandparents –– you name it!) scroll to the right of
your hexagons and tap “Add.”
Two additional spaces to note:

Drop down menu: If you’re in multiple groups, or your classroom is part of a larger school Honeycomb group, you can move between communities by tapping the drop down menu at the top of the screen and selecting a community.
Help/feedback button: Tap the ?! icon in the upper right corner of your screen, and then tap “DM Honeycomb” to reach our customer support team. We’re here to answer any questions and love to hear feedback!
Now that you have your bearings, help get the rest of your community’s families onboard. Your group has the highest value if your whole class or parent crew joins. Together, it’s easier to stay on top of dates and to-dos, and you can say goodbye to tracking down contact info for bday parties.

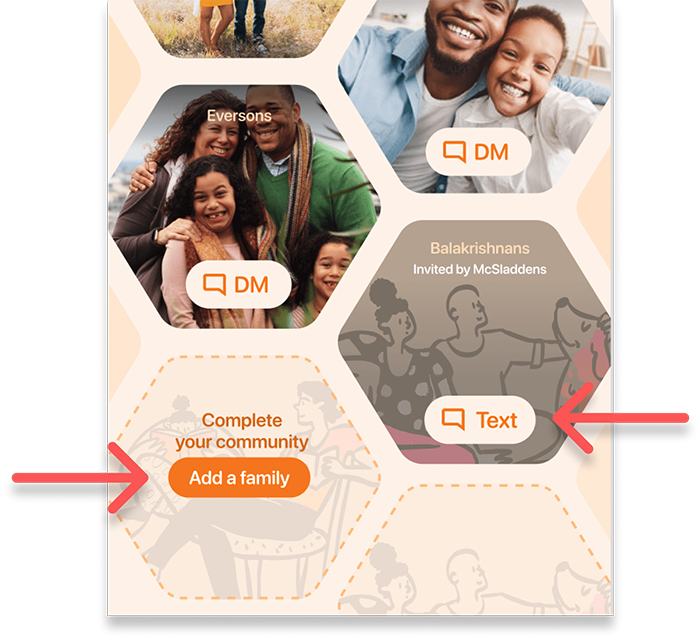
Add a family: Tap the big orange plus button at the bottom of the screen, then tap “Invite families” to get a unique link to share, or to invite families via email or text. You can also scroll down to the last family hexagon in the Directory, and tap “Add a family." Text invites are sent one-at-a-time, while email invites or unique link can be sent to multiple families at once.
Honeycomb populates a message for you, which you can edit or personalize before sending. We also save an image of your Honeycomb directory and calendar to your camera roll so you can include them in your invite. You'll get a better response if you can show fellow parents what makes Honeycomb special!
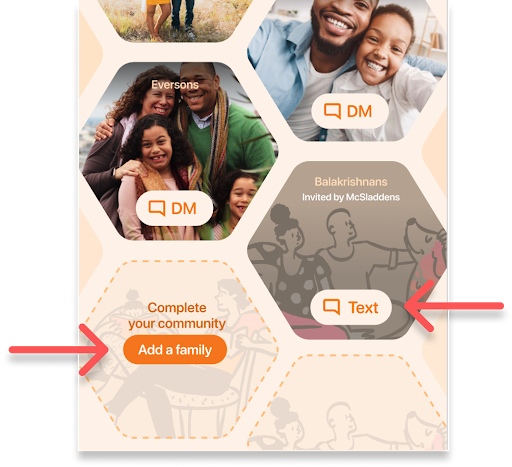
Nudge a family: See a parent name on a gray hexagon? This means they haven’t finished signing up. Tap “Text” to get in touch, and while you’re at it send them a reminder –– your text will populate with a link to help them complete sign up.
Smart shared calendar
Stop sifting through multiple calendars, chat threads, and buried PDFs. Honeycomb brings it all together with a smart, AI-powered shared calendar that has chat threads and coordination built right in.
It all starts by turning your emails into a shared calendar & to-do list: Honeycomb’s AI assistant, Worker Bee, extracts dates and details from your school or club emails, so you don’t have to!

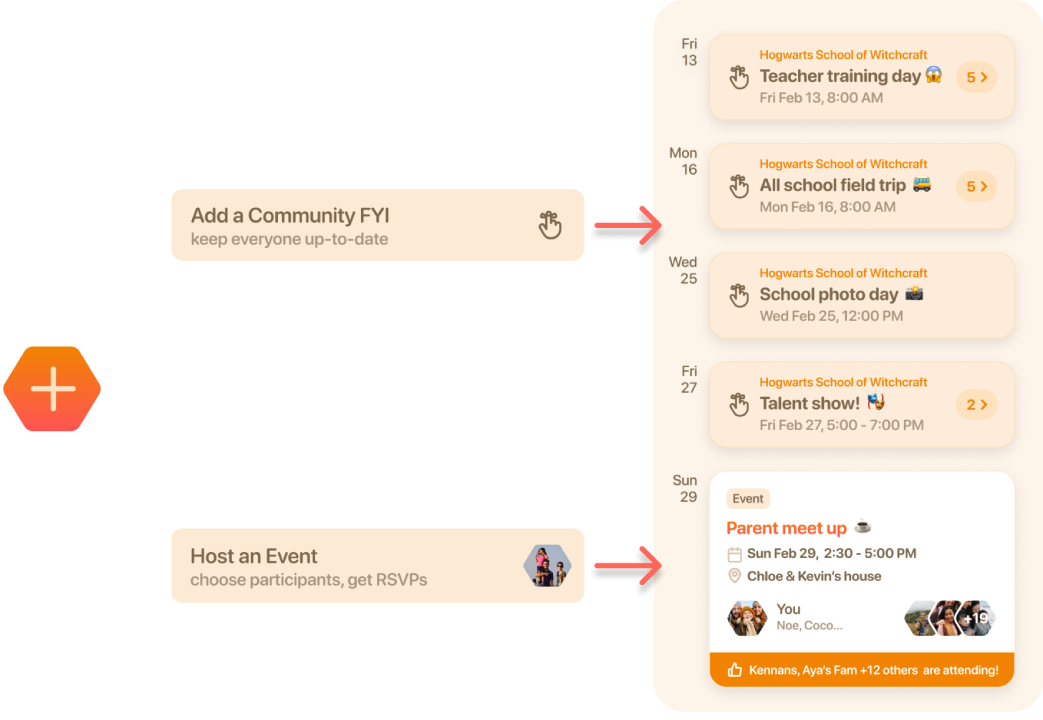
Honeycomb’s calendar includes Community FYIs and Events, each of which have their own chat thread to make it easy to share updates and collaborate on logistics.

Community FYIs are lightweight shared reminders that help keep everyone up to date and surface opportunities to collaborate. FYIs don’t have hosts, are visible to the entire community, and anyone can edit them. They have space for useful information and links, as well as their own chat. Think: reminders for no school days, photo day, class recitals.

Events have the functionality of an evite without the hassle. The host chooses invitees and adds event information. Then Honeycomb nudges for RSVPs and send reminders. Only the host can edit an Event. Think: birthday parties, school potlucks, volunteer days.
Is your Honeycomb Calendar always up-to-date? Then one of your fabulous fellow families is a Worker Bee buddy. Want to get the benefits of a smart, shared calendar that keeps you on top of everything (while never having to add another date to your calendar)? Become a Worker Bee buddy.
Got an entire school calendar or team schedule to share with your group? Learn how to upload it in app here, or email it to magic@honeycomb-labs.com we’ll do it for you. Really.
Family
accounts
No more random phone numbers in your classroom group chat or WhatsApp thread: Honeycomb profiles include photos and info about the whole fam.
Honeycomb’s family profiles also mean you can communicate across a childs’ family instead of guessing who a primary parent is, and siloing the other.
Get to know your community and what’s important to them, and easily access info when you need it with dietary restrictions, allergies and contact info in a single space.
Topic-based chat: Honeycomb’s topic-based chats keep your conversations neatly organized. Whether it’s something timely, like teacher appreciation gift ideas, or long-term, like summer camp planning, separate chat threads help make logistics less overwhelming. Separate threads also give participants control over muting or leaving specific topics.
To start a chat, tap the “New Chat” button, choose participants –– you can invite your whole group, or a subset of families –– and give your chat a topic. Looking for inspiration on what to post? Visit our Community Building Guidebook.
Community Chat thread: This thread automatically populates with everyone in your community or classroom when you join Honeycomb. When new members join, they are added and can see the chat history. It’s great for general announcements or updates.

 Magic powers:
The orange plus in the bottom left corner of any chat unlocks a lot of features. Use
it to add photos or files to the chat, or as a shortcut to invite everyone in the
chat to an event. Find features that make sharing care easy, from offering care via
a drop-off playdate to proposing a swap with your chat group (date night, anyone?).
Magic powers:
The orange plus in the bottom left corner of any chat unlocks a lot of features. Use
it to add photos or files to the chat, or as a shortcut to invite everyone in the
chat to an event. Find features that make sharing care easy, from offering care via
a drop-off playdate to proposing a swap with your chat group (date night, anyone?).
Emojis: Share some love with a like or heart by tapping and holding over a message.

Tap the big orange plus button at the bottom of the screen, then tap “Create a new community” and follow the prompts.
If you’d like to bring Honeycomb to a new school, you can connect your
school leadership (your Room Parent, PTA leader or Preschool Director)
to Honeycomb to help kickoff the convo. Just email help@honeycomb-labs.com to
get started.
Honeycomb is entirely free. In the future, a Honeycomb parent may have the option to opt-in to a premium version of Honeycomb that offers special features that help them save time, like a carpool coordination tool. This will be optional and won’t impact a parents’ ability to use all of Honeycomb’s existing features.
Email help@honeycomb-labs.com, or tap the ?! icon in the upper right corner of the app to reach out to our customer support team. We’re here to help!
Honeycomb is founded by parents of little kids who are active users of the app –– we treat Honeycomb user data the same way we'd want our own family data treated by any service we use.
Honeycomb is a private visual directory and shared calendar for your community, designed to help families build stronger connections within trusted groups. We ask for some basic info about your family during sign up, such as family name and photo, and your child’s first name, photo and birth month (to show age to others) to help facilitate community building.
Any content created by a user is private to their communities, including messages, photos and profile data. This content cannot be forwarded off of Honeycomb. We've also built privacy controls into the app so that users get to choose –– for certain pieces of data like phone, email, address –– whether they're made visible to others in their community. We're continually evolving these controls. You can read more about how we handle privacy and security here.
We ask for Photos and Contacts permissions in-app to simplify your experience of completing your profile and inviting families to join, but the only data we store on our servers is data that you explicitly choose, or create in the app. We don’t store your address book and we don’t upload any photos you haven’t explicitly selected as a profile photo or shared in a post.
It's highly recommended that you enable notifications so you don’t miss invites and conversations in your community. We also know parents have a wide range of participation preferences, so we’ve made it easy to manage notifications in the app:
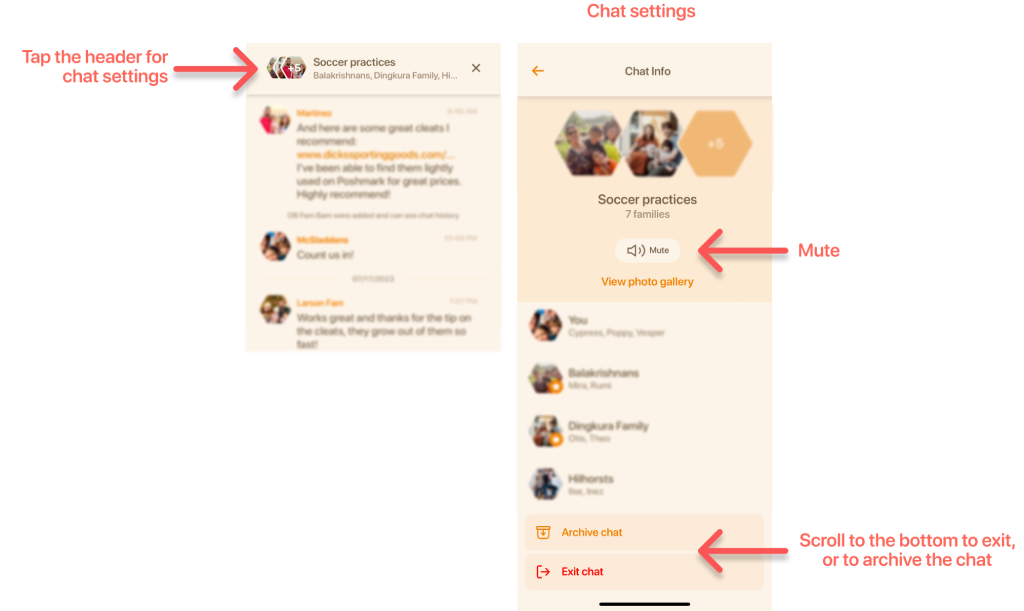
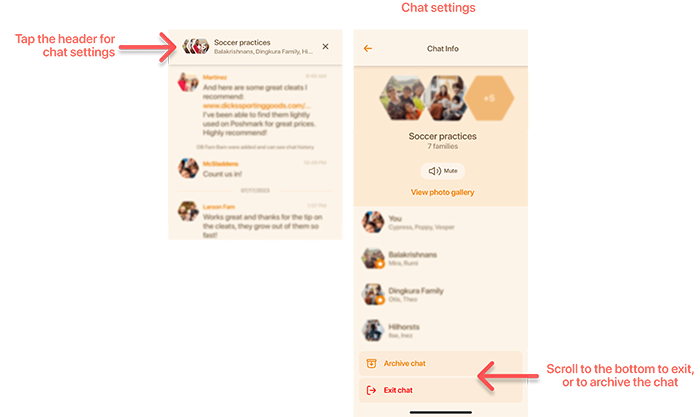
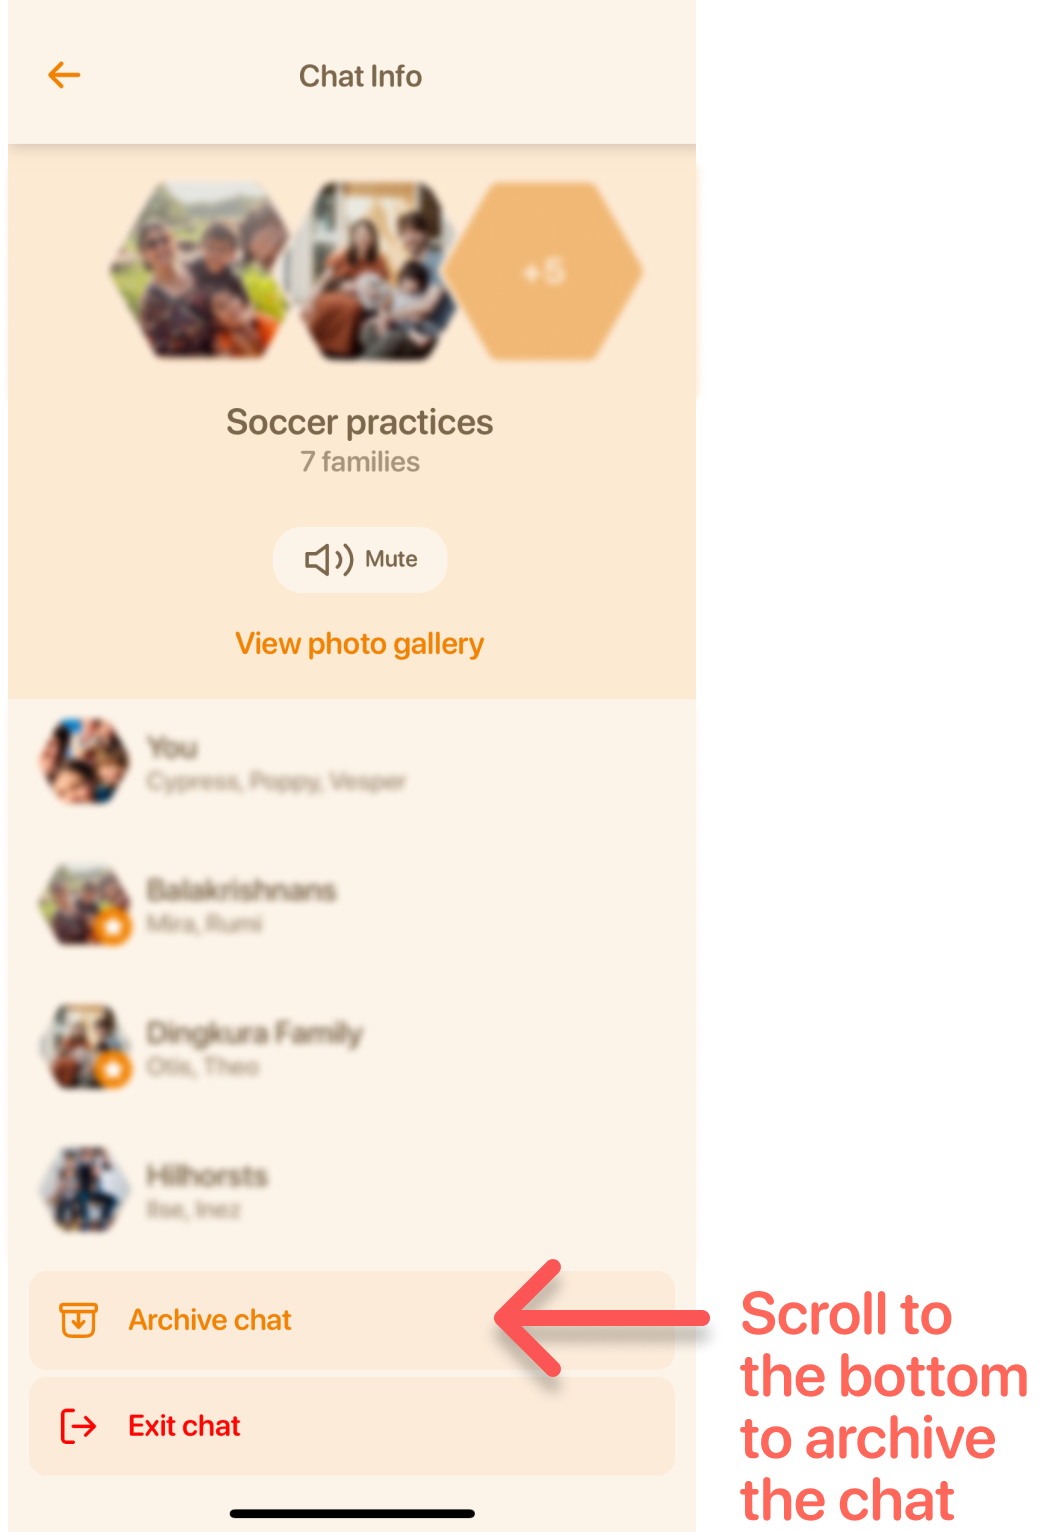
Chats: you can mute any chat by swiping left on it in the chat tab, and you can exit group chats via the chat’s settings. See how here.
Reminders: to change reminder notifications, go to your profile (bottom
right icon in your tab bar). Tap the gear in the upper left, and choose
“Notification preferences.”


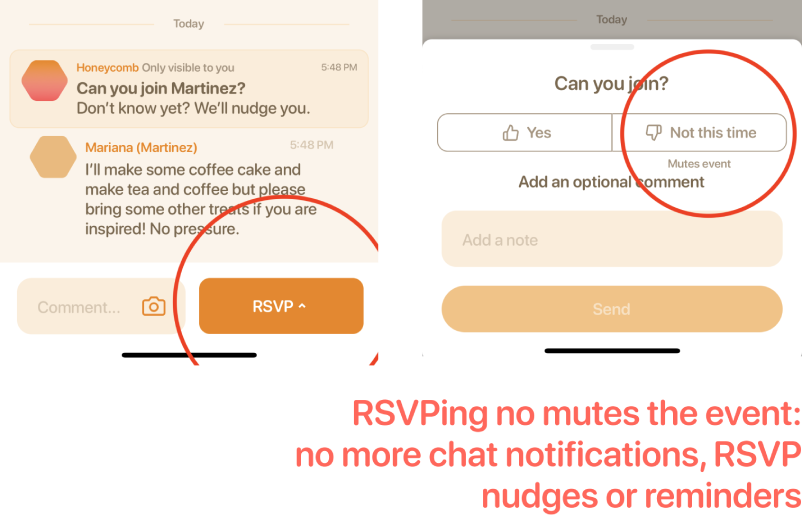
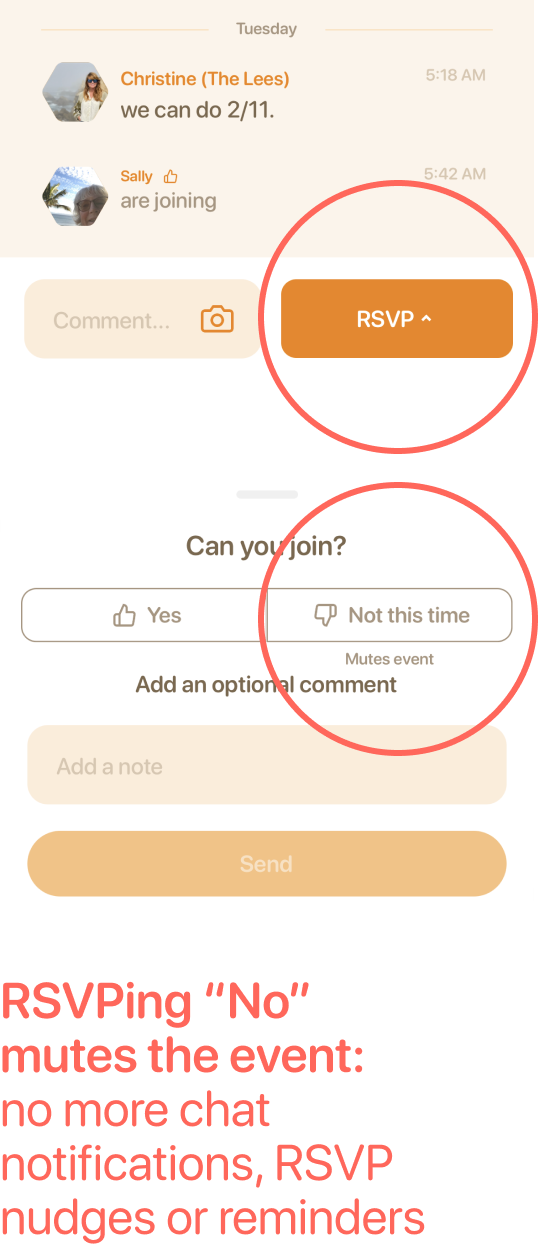
Events: if you RSVP “no” to an event, you will stop receiving all event notifications.
If you’d like to turn off all notifications for the app, you can do this via your phone settings.
Parents will receive a notification when you post a chat to a group they are part of, and a daily reminder if they have unread chats. In larger conversations, chat notifications start only once a parent opens the chat. Parents can mute or exit a chat thread at any time.
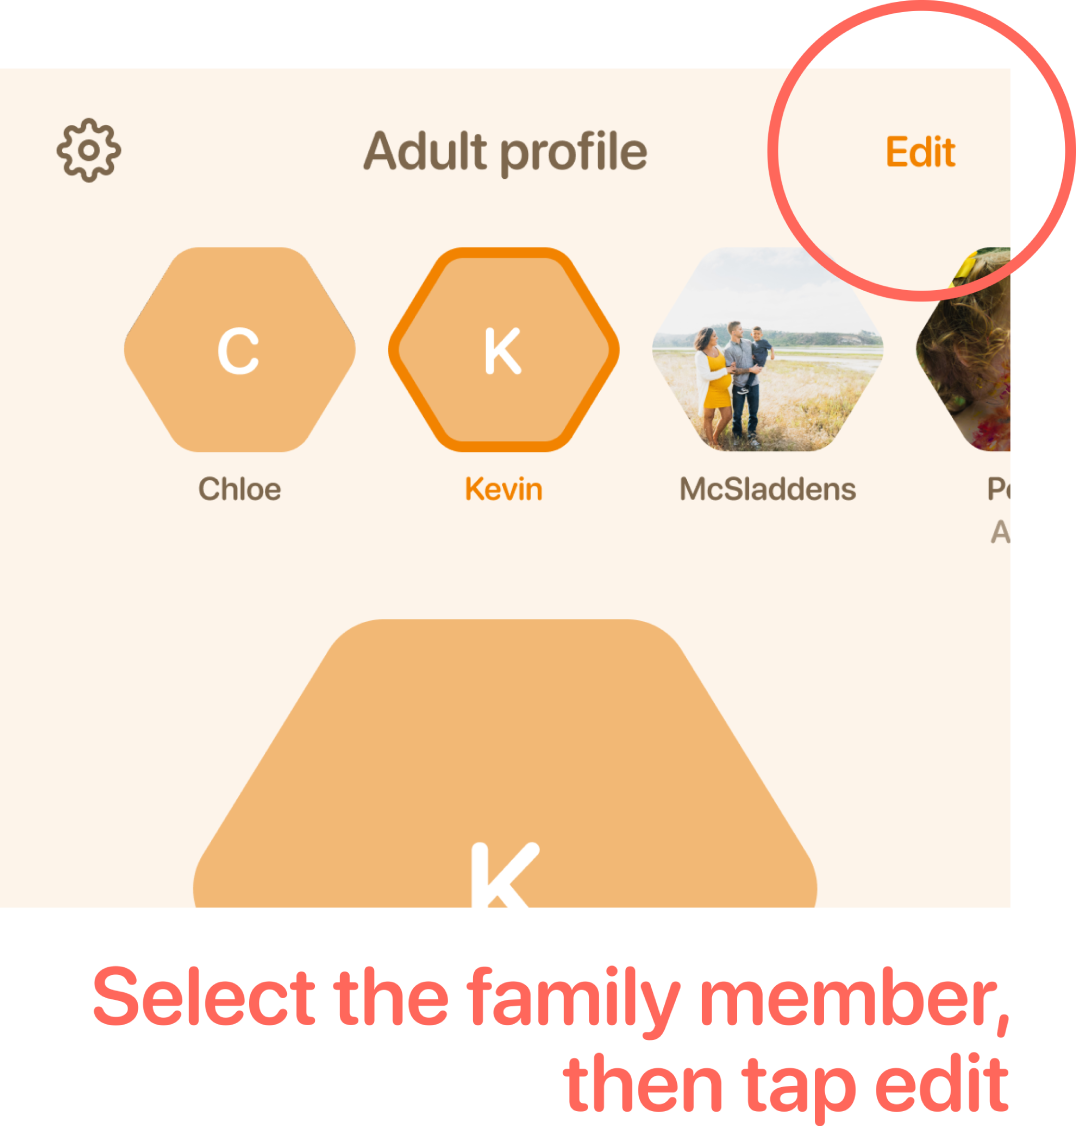
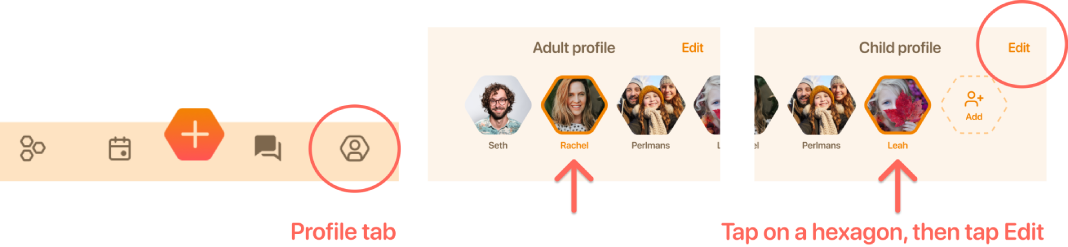
Go to your profile tab, and tap the family member whose profile you want to fill out. Tap “Edit” in the upper right. When you are done, tap “Save” in the upper right.

Go to your profile tab and scroll hexagons to the left until you see “Add.” If you’re adding an adult, you can add their phone number and they will receive a text to join your account.
To remove a family member, choose that family member, tap “Edit,” then scroll to the bottom of their individual profile and tap “Delete member.”
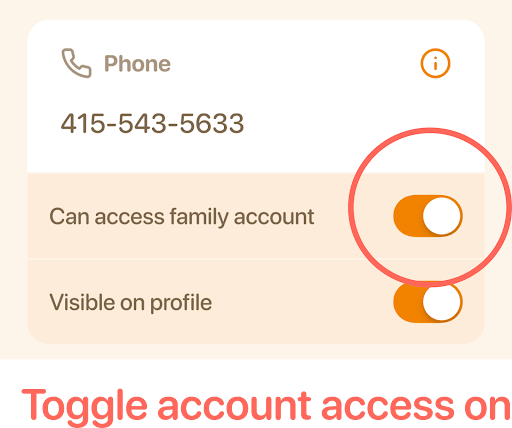
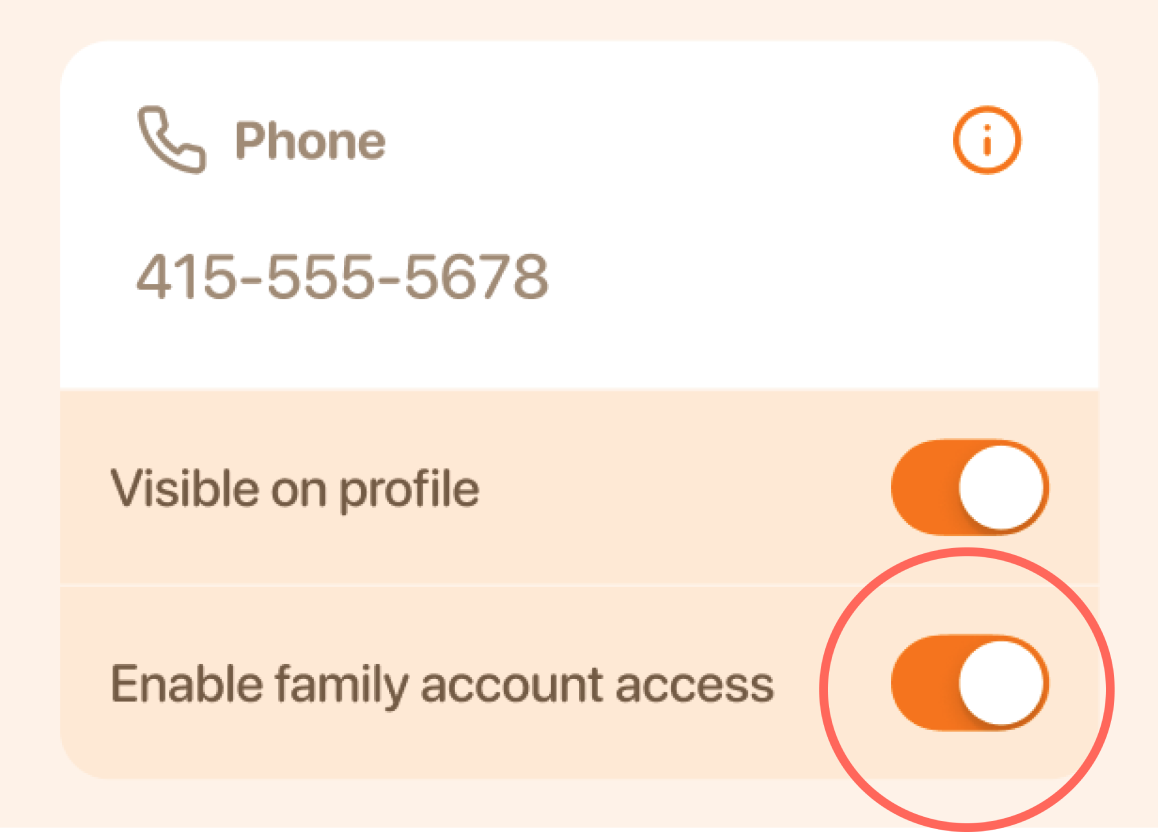
For parents and caregivers in the same household, sharing family account access keeps all adults in the loop. It means you can see the same stuff (messages, calendar, etc.) as well as post messages, respond to and create events, edit the family profile and more.
If you still need to add your partner, go to Profile, scroll the hexagons to the left, and tap “Add.” Enter their info including mobile number (account access is default set to on), and tap “Save” (upper right).
If you’ve already added your partner but did not give access during account set-up, tap the Profile tab, select their hexagon, and then tap Edit (upper right). Add a mobile phone number (account access is default set to on), and tap “Save.”
The newly added parent will receive a text to join your family account.
Do whatever works best for your family, but in general we recommend setting up one account per parent household.
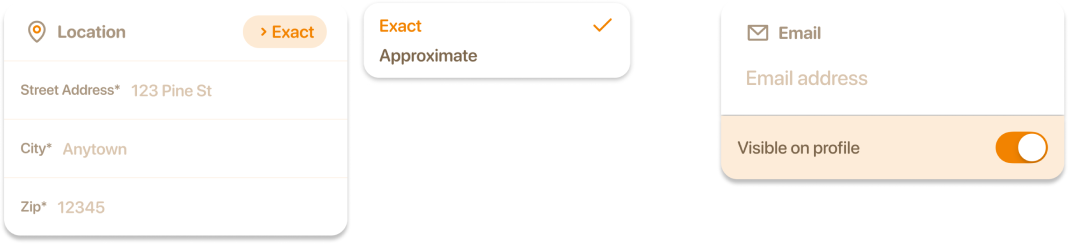
You control what you make visible to your community. For address, in your Family profile, you can also choose whether to share an exact or approximate address. For email and phone, choose the adult member, tap Edit, then set the toggle “Visible on profile” to your preference.

To add allergies, tap on your child’s hexagon, tap Edit, and fill in allergy information.
Topic-based threads keep chats organized and give participants more control over muting or leaving chats. In the chat tab, tap the “New Chat” button, choose participants –– you can invite your whole group, or a subset of families –– and give your chat a topic.
Topic-based threads keep chats organized and give participants more control over muting or leaving chats. In the chat tab, tap the “New Chat” button.
Your Community Chat automatically populates when you join Honeycomb, and includes all group members by default. It’s great for general announcements and updates.If a new community member is added to your group, they’ll be able to read the history. If you want to kick off a conversation, we recommend tapping “New Chat.”
The ability to archive chats is coming soon.
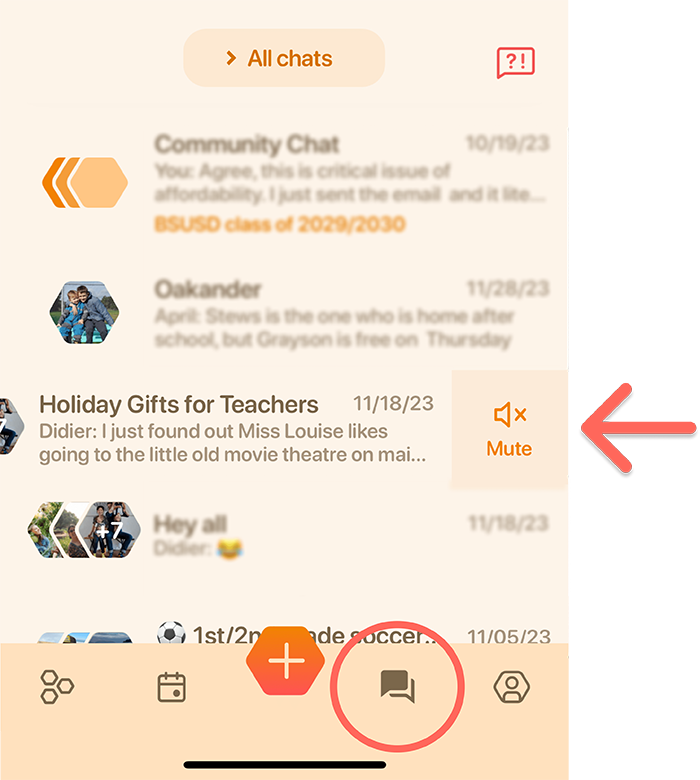
In the chat tab, swipe left on any chat summary to reveal a mute option for that thread.
Or, from within the chat detailed view, tap the chat’s header to get to settings, then tap “Mute.” To exit the chat, scroll to the bottom of the participants list and tap “Exit.” Note that you can mute, but not exit, your group’s Community Chat thread. You cannot exit a chat that you created.
Or, from within the chat detailed view, tap the chat’s header to get to settings, then tap “Mute.” To exit the chat, scroll to the bottom of the participants list and tap “Exit.”
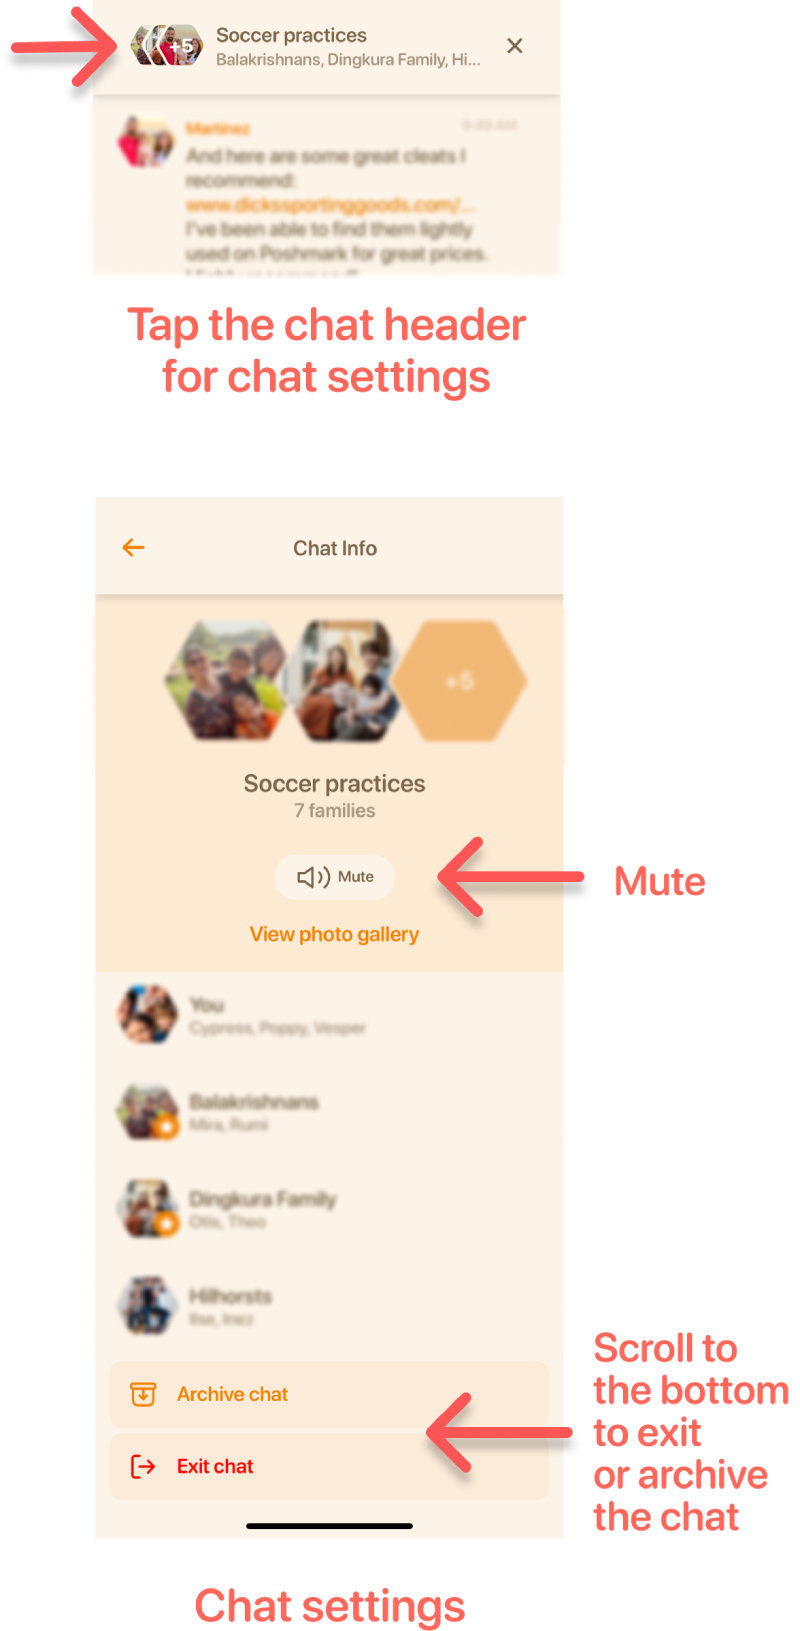
Note that you can mute, but not exit, your group’s Community Chat thread. You cannot exit a chat that you created.
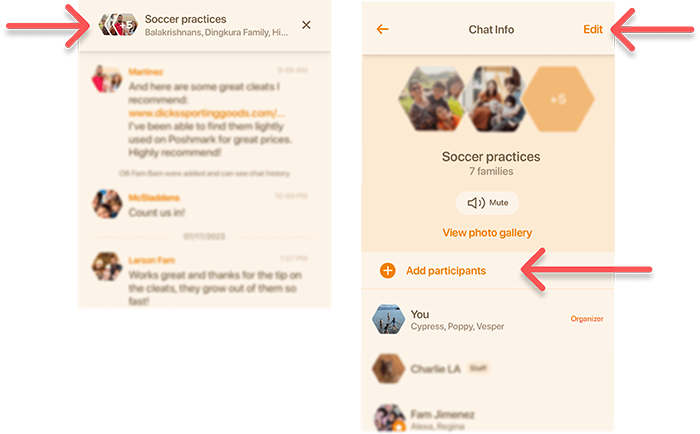
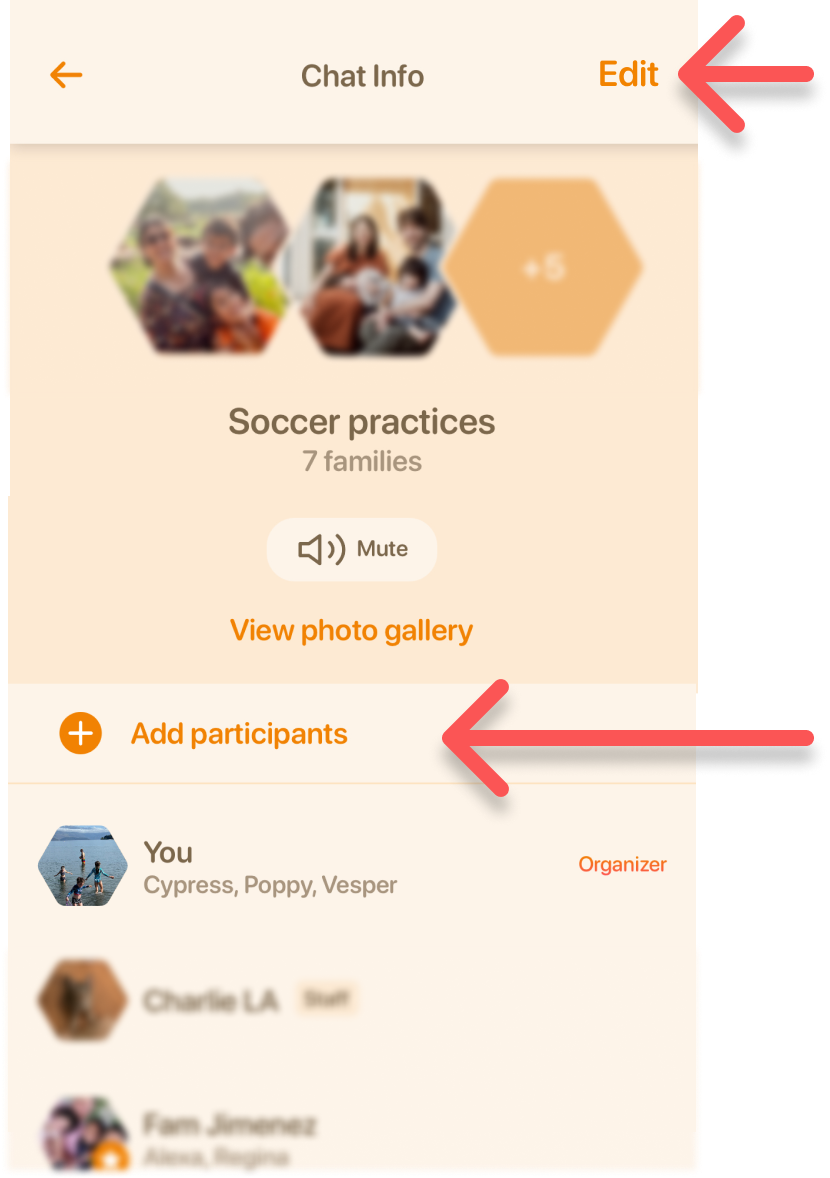
If you created a chat, tap the chat header to get to settings, then tap “Edit” to change the topic. Tap “Add participants” to add someone. Newly added participants will be able to see the chat’s history.
You can’t remove someone from a chat yet, but this feature is coming soon.
Events and FYIs, and their chats, are auto-archived once they are in the past.
To manually archive any chat, first go to the chat’s detailed view and tap the chat’s header to get to chat settings. Then scroll to the bottom of the participants list and tap “Archive.”
To find archived chats in the chat tab (whether auto-archived or manually archived), tap the drop down pill and tap on “Archived chats”.
To find archived Events and FYIs from the calendar tab, tap the drop down pill and tap on “Past activity”.
This feature is coming soon! In the meantime, you can email help@honeycomb-labs.com or tap the ?! icon in the upper right corner of your screen with a request to delete or edit an existing post. We’re happy to take care of that for you in a jiff.
How to translate a post:
How to translate your own post before you send it:
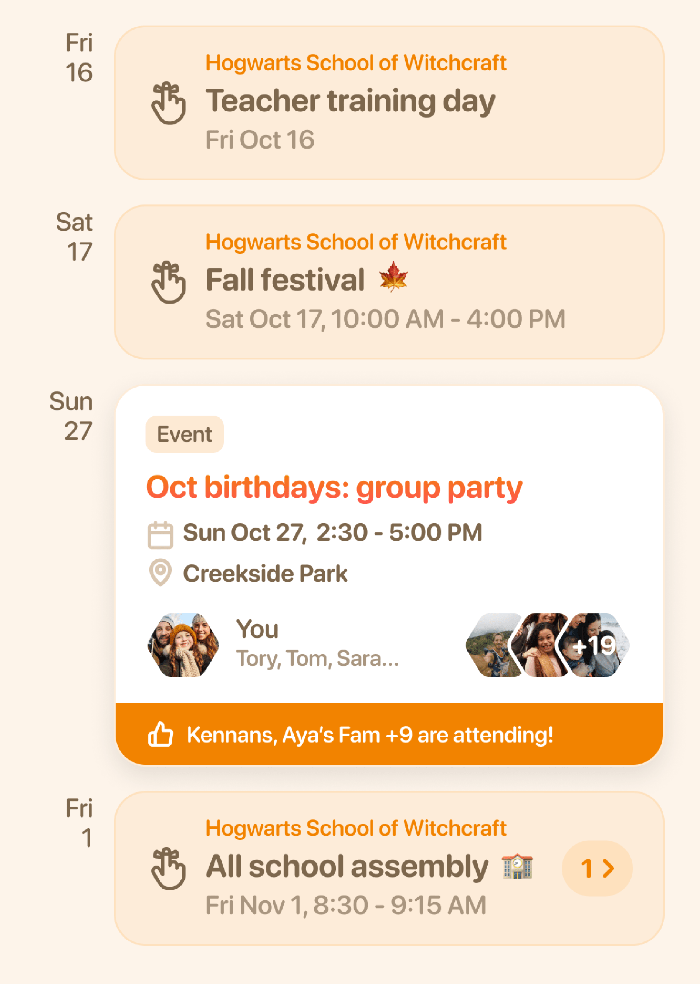
 Community FYIs are lightweight, shared reminders. Think: no school days,
class recitals, permission slip deadlines. They are visible
community-wide (you pick whether that’s your classroom/team or the
entire school/club), and anyone can add them. FYIs have space
for helpful information, as well as their own chat. FYIs have no host, and anyone in the community can edit them to help keep the shared calendar up-to-date.
Community FYIs are lightweight, shared reminders. Think: no school days,
class recitals, permission slip deadlines. They are visible
community-wide (you pick whether that’s your classroom/team or the
entire school/club), and anyone can add them. FYIs have space
for helpful information, as well as their own chat. FYIs have no host, and anyone in the community can edit them to help keep the shared calendar up-to-date.
Keep FYIs up-to-date by forwarding your school or club emails to Worker Bee, Honeycomb’s AI assistant.
How are FYIs different from Events? A Honeycomb Event is similar to a
lightweight Evite, with an invite list you determine as the host, and includes nudges for your guests to RSVP. Think: birthday parties, school
potlucks, volunteer days –– any time you need to know who is coming. Only the host can edit an Event.
Any parent can create Events or add FYIs to their community, and any parent can –– and ideally would! –– update an existing FYI to help keep the shared calendar up-to-date.
Tap the orange plus button from any tab, then select Community FYI or Event and follow the prompts.
To get your Honeycomb calendar set up, it’s best to import your existing calendar and then use Worker Bee to keep it up-to-date via forwarding newsletters and update emails.
We support syncing Google and ical digital calendars, and can import calendars that are PDFs or images (like a photo of the calendar on your fridge). (Sync: when the original calendar is updated, those updates automatically show in your Honeycomb calendar. Import: we bring in the data once; it doesn’t live update.)
You can add a calendar via the “Review Emails” chat with Worker Bee (part of setting up your Smart Calendar).
To sync a gcal or ical, you need to enter the link or id for the calendar. Go to your school/club website on your computer (not mobile) and find the calendar:
1. Find the subscribe button (it may be a simple plus, a calendar with a plus, an RSS feed or an ical icon––or something else!). For Google Calendar, tap on the ‘+’ icon at the bottom right of their calendar.


2. After you’ve tapped the subscribe icon, copy what might look like an email or long bit of gobbledygook (if it’s an ical ID). For ical, it might be a webcal url or an .ICS url.
3. Paste and send it into your Review Emails chat with Worker Bee.
Google calendar only: if you already subscribe to the calendar or your school’s Google calendar doesn’t pop up with Google calendar ID, you may need to find the Public URL in the calendar’s settings. From your computer (this feature is not available in mobile):
1. Open Google Calendar.
2. At the top right, go to Settings.
3. On the left side, under "Settings for my calendars," click the name of the school/club Google calendar.
4. Click “Integrate calendar” and then copy the link in "Public URL to this calendar."
An imported digital calendar remains synced with Honeycomb –– as changes happen to the school/club Google calendar, those changes automatically show up in Honeycomb.
Community FYIs are designed to be easily shared with your entire community. You can choose whether that’s your classroom or squad, or the entire school or team.
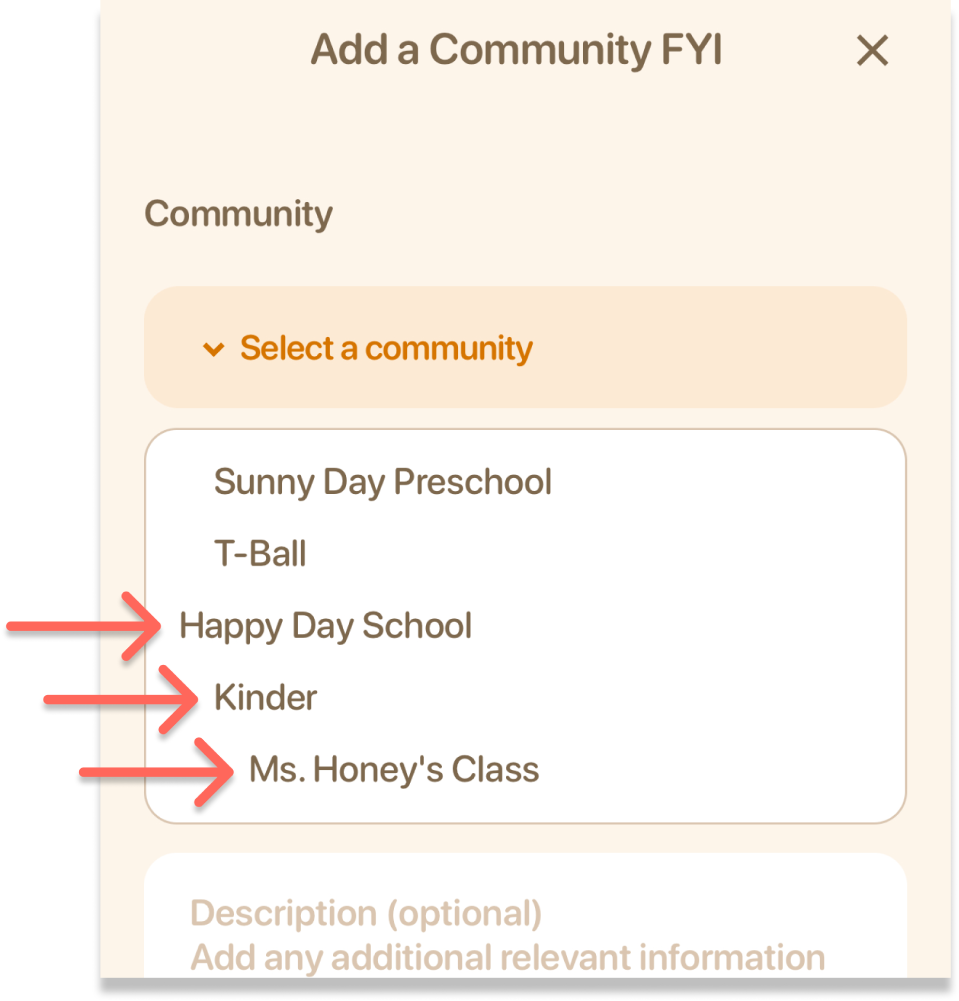
After tapping on “Add a Community FYI” from the plus-button, tap on the “Select a community” bar at the top of the screen to choose which community you want to share the FYI with. Depending on how your Honeycomb communities are set up, you may be able to pick the entire school or club (in this case, Happy Day School), an entire grade or larger group (e.g. Kinder), or just your classroom or squad (e.g. Ms Honey’s Class).
For now, once you’ve published an FYI you can’t edit the audience it’s shared with. If you need to change the audience, you’ll need to delete and re-add for now.
Plans and dates change! Tap the FYI to get to its detailed view, then tap the header of the FYI to get to settings. From here, tap “Edit” in the upper right corner. Since Community FYIs are shared across your community, your edits will be reflected for your entire community.
Just as with any chat, you can mute a Community FYI from the chat tab by swiping left. Or you can go into the Community FYI’s detailed view, tap its header to get to settings, and tap mute to turn off notifications for the FYI’s chat.

Go to the Honeycomb Calendar tab, tap the add-to-calendar icon in the upper left corner, and follow the prompts. This will bring all your community’s FYIs (including school/club-wide FYIs) into your calendar and ensure they auto-sync as updates happen in the Honeycomb app. (Note: the Honeycomb calendar does not include Honeycomb Events, as those have their own unique invite lists chosen by their hosts, while FYIs are always visible community-wide.)

You can also add FYIs and Events individually to your calendar via the add-to-calendar icon in each FYI or Event’s header. Note: if you add FYIs or Events individually, they won’t auto-sync when changes happen in your Honeycomb calendar*. Subscribing to the Honeycomb calendar is the best way to ensure you always have the most up-to-date information via Honeycomb.
(*Let us know if you think auto-sync of individual Events or FYIs is important via hello@honeycomb-labs.com)

Honeycomb Events have invitee lists chosen by their hosts, and are usually not community-wide. Event hosts and invitees can add individual Events into their calendar app by tapping the calendar plus button in any event’s header.

You can add individual Events and FYIs to your calendar by tapping the add-to-calendar icon in the FYI or Event’s header. Note: if you add FYIs or Events individually, they won’t auto-sync when changes happen in your Honeycomb calendar*. Subscribing to the Honeycomb calendar is the best way to ensure you always have the most up-to-date information via Honeycomb.
(*Let us know if you think auto-sync of individual Events or FYIs is important via hello@honeycomb-labs.com)
To get your Honeycomb calendar set up, it’s best to import your existing calendar and then use Worker Bee to keep it up-to-date via forwarding newsletters and update emails.
We support syncing Google and ical digital calendars, and can import calendars that are PDFs or images (like a photo of the calendar on your fridge). (Sync: when the original calendar is updated, those updates automatically show in your Honeycomb calendar. Import: we bring in the data once; it doesn’t live update.)
You can add a calendar via the “Review Emails” chat with Worker Bee (part of setting up your Smart Calendar).
To sync a gcal or ical, you need to enter the link or id for the calendar. Go to your school/club website on your computer (not mobile) and find the calendar:
1. Find the subscribe button (it may be a simple plus, a calendar with a plus, an RSS feed or an ical icon––or something else!). For Google Calendar, tap on the ‘+’ icon at the bottom right of their calendar.
2. After you’ve tapped the subscribe icon, copy what might look like an email or long bit of gobbledygook (if it’s an ical ID). For ical, it might be a webcal url or an .ICS url.
3. Paste and send it into your Review Emails chat with Worker Bee.
Google calendar only: if you already subscribe to the calendar or your school’s Google calendar doesn’t pop up with Google calendar ID, you may need to find the Public URL in the calendar’s settings. From your computer (this feature is not available in mobile):
1. Open Google Calendar.
2. At the top right, go to Settings.
3. On the left side, under "Settings for my calendars," click the name of the school/club Google calendar.
4. Click “Integrate calendar” and then copy the link in "Public URL to this calendar."
An imported digital calendar remains synced with Honeycomb –– as changes happen to the school/club Google calendar, those changes automatically show up in Honeycomb.
School calendars usually include the big stuff — like no school days and conferences — but miss important dates like field trips, permission slip deadlines and theme days. Your Honeycomb calendar should be much more up-to-date because it includes events and reminders added by fellow families and by Worker Bee, Honeycomb’s AI community assistant, which automatically extracts dates and to-dos from school-wide emails and newsletters.
Add a family: Tap the big orange plus button at the bottom of the screen, then tap “Invite families” to get a unique link to share, or to invite families via email or text. You can also scroll down to the last family hexagon in the Directory, and tap “Add a family."
Text invites are sent one-at-a-time, while email or link invites can be sent to multiple families at once.
Honeycomb populates a message for you, which you can edit or personalize before sending. We also save an image of your Honeycomb directory and calendar to your camera roll so you can include them in your invite. You'll get a better response if you can show fellow parents what makes Honeycomb special!
 Nudge a family: See a parent name on a gray
hexagon? This means they haven’t finished signing up. Tap “Text” or "Email" to get
in touch, and while you’re at it send them a reminder –– your message will
populate with a link to help them complete sign up.
Nudge a family: See a parent name on a gray
hexagon? This means they haven’t finished signing up. Tap “Text” or "Email" to get
in touch, and while you’re at it send them a reminder –– your message will
populate with a link to help them complete sign up.

If you are in more than one classroom, team or community on Honeycomb –– or if your entire school, club or program uses Honeycomb –– you can move between communities by tapping the drop down pill menu at the top of the screen.
In the drop down pill in the Directory tab, darker letters indicate communities your family is a member of.
Tap the ?! icon in the upper right corner of your screen to contact Honeycomb support, or email help@honeycomb-labs.com with your request.
Some Honeycomb communities have teachers and staff as part of their communities, and some don’t. Regardless, teachers, staff and administrators are never able to access Honeycomb content they have not been invited to join.

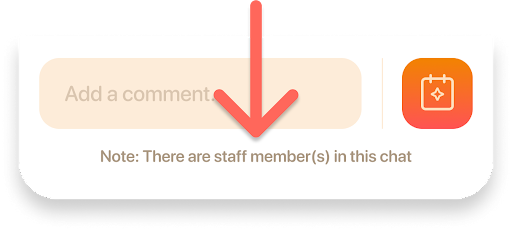
As a platform focused on parent-to-parent communication, we want parents to clearly know when a school or organization’s staff are present. So we badge staff profiles, and, whenever a staff member is in a chat, we include a notice near the comment box to alert you.
If your Honeycomb community or classroom does include teachers or staff, they will be able to see posts in your Community Chat and in FYI chats, as these include everyone in the community by default (look for the “staff member(s) in this chat” notice). You can see which staff are part of a chat thread by tapping the chat header to get to settings, and then scrolling through the participant list and looking for the staff badge.
When you start a new chat on Honeycomb, or set up an event, you are always in control of whether to invite staff, and they are clearly marked with staff badges during the invite process.

Navigate to the “Setup your smart calendar” guidebox at the top of your calendar tab. You can also find our step-by-step guide here!

To get your Honeycomb calendar set up, it’s best to import your existing calendar and then use Worker Bee to keep it up-to-date via forwarding newsletters and update emails.
We support syncing Google and ical digital calendars, and can import calendars that are PDFs or images (like a photo of the calendar on your fridge). (Sync: when the original calendar is updated, those updates automatically show in your Honeycomb calendar. Import: we bring in the data once; it doesn’t live update.)
You can add a calendar via the “Review Emails” chat with Worker Bee (part of setting up your Smart Calendar).
To sync a gcal or ical, you need to enter the link or id for the calendar. Go to your school/club website on your computer (not mobile) and find the calendar:
1. Find the subscribe button (it may be a simple plus, a calendar with a plus, an RSS feed or an ical icon––or something else!). For Google Calendar, tap on the ‘+’ icon at the bottom right of their calendar.
2. After you’ve tapped the subscribe icon, copy what might look like an email or long bit of gobbledygook (if it’s an ical ID). For ical, it might be a webcal url or an .ICS url.
3. Paste and send it into your Review Emails chat with Worker Bee.
Google calendar only: if you already subscribe to the calendar or your school’s Google calendar doesn’t pop up with Google calendar ID, you may need to find the Public URL in the calendar’s settings. From your computer (this feature is not available in mobile):
1. Open Google Calendar.
2. At the top right, go to Settings.
3. On the left side, under "Settings for my calendars," click the name of the school/club Google calendar.
4. Click “Integrate calendar” and then copy the link in "Public URL to this calendar."
An imported digital calendar remains synced with Honeycomb –– as changes happen to the school/club Google calendar, those changes automatically show up in Honeycomb.
Go to your calendar tab and follow the instructions in the box titled "Setup your smart calendar" setup box" (at the top of your calendar tab).

If your smart calendar has already been setup, then go to your family’s profile tab, tap on your hexagon at the top, then tap Edit in the upper right. Scroll down to the "Worker Bee Buddy" section and select the community you want to enable Worker Bee for. If the section is greyed out, that means the maximum number of Worker Bee Buddies have been assigned.
1. If you haven’t started set up: activate Worker Bee by going to the “Setup your smart calendar” guidebox at the top of your calendar tab. (If your chat tab doesn’t have smart calendar instructions, someone else has already set it up.) Tapping the button will take you to the "Worker Bee AI Review" chat in the chat tab.
If you have started set up: Tap on the “Worker Bee AI Review” chat in your chat tab.

2. Tap on the chat's header to get to the Worker Bee instructions, which include your unique Worker Bee email. It’ll look like: magic+group-name-584@newsletter.honeycomb-labs.com
Parents: once you’ve got Worker Bee’s email, forward your most recent school or club newsletter to it. Ready to set-it-and-forget-it? Learn how to set up email auto-forwarding.
Directors: just add Worker Bee’s email to your newsletter and school-wide email distribution list.
AI isn’t perfect yet, so we ask a parent or staff member to be a Worker Bee “review buddy”. They do a quick check before publishing dates to the Honeycomb Calendar. More than one person can be an review buddy!

Look for the lifesaver icon on profile photos to see which families are being awesome and helping keep your Honeycomb Calendar up-to-date and useful by forwarding emails and reviewing Worker Bee’s work.